Powered By Blogger

Friday, February 7, 2020

Homemade Vintage Valentines Cards Project

Hi Friends,
I have been wanting to do this project for a long time.


I actually have a day off today so I'm going to make Valentines free printable bottle label and cupcake toppers free Vintage Valentine prints

Using red construction paper I cut out heart shapes with my Fiskars paper edgers


cut out the vintage valentine prints and glued them to the hearts.
I decided to add glitter pipe cleaners/chenille stems from Dollar Tree gluing around the picture, I tea stained a roll of white crepe streamer and glued around edge of the construction paper heart


using markers I added some more writing and outline some of the hearts


more free prints from vintage kids valentines cards
I cut out the prints and glued them on some colored card stock I had.  Using a sharpie I went around the hearts to highlight.


I also tea stained a couple of pages from a paper back book I no longer need to cut out little hearts and to make little roses I saw this technique from Tracy at Country Charm by Tracy making roses from crepe paper. 


Here is the finished project


I think they turned out so adorable and I really had fun making these vintage print valentines to give to friends and family.  Let me know which were your favorite. 

Thanks for stopping by and until the next celebration.  

Have a Great Day!   

Vicki

Sunday, February 2, 2020

February Vintage Farmhouse Décor Project


Hi Friends,

I'm at it again with another project.  
Thrifted Wooden Heart Transformed to fit into my February Vintage Farmhouse Décor 


I haul this wooden heart earlier this month and am just now getting to this project.  
  I'm going to white chalk paint it


Then using some yardage of red and white striped fabric I'll cover the wood heart.
I traced the heart shape on to the striped fabric 


using Aleene's Tacky Glue to attach the fabric cutout onto the wooden shape.


I've had this wooden love piece for sometime, I'm pretty sure it came from Dollar Tree.  I just painted it with the Waverly White Chalk paint distressed it with a black sharpie
 

Here I added some fabric hearts and a button to the top and at the bottom of the heart.


Using some fine sand paper I sanded down the excess fabric off the edge when it had dried.

This was a fairly simple projects, allowing the fabric to dry took over night, but all in all this project was easy and quick.

Thank you for stopping by My Little Colorado Cottage and checking out another of my February projects.

God Bless you, Vicki a Colorado Junkett


Valentine Rustic Mantel - Decorate with Me


Hi Friends,

Not much new this year so far,  I  added quit a few new items last year to my February décor.

To start off my decorating for February, I'm starting with the mantel.  I left the pinecone wreath I made this year for my January winter décor and the black and white checked homespun rag garland I also made last year with black and white checked fabric and a piece of white yarn, the evergreen garland from Walmart is left up through March.  This year I added a wooden black buffalo check heart to the wreath, placed wooden children's letter blocks I picked up in a thrift haul in January that spell LOVE.  Some frosted tiny cones, red berries from Dollar Tree, a "XO" conversational hearts and a "All of Me Loves all of You!", I made last year.


Like this gray heart made with puzzles pieces, the little wooden heart with "A Key to My heart".


I did find a few cute items this year at my local thrift store, so I'll show you where I added my new revamped thrifted purchases through out this month.

Thank you so much for checking in to see what project I'm working on now.

God Bless you and your family, 
Vicki a Colorado Junkett


Saturday, February 1, 2020

February2020 Thrift Haul - All Kinds of Hearts


I was so excited to find some items to add to my valentine decor. 


wire heart for $0.50


Heart shape hot pad, so cute!


Pack of paper napkin for $0.50


This packet I think I will be rusting.


1st of February is kind of late to be thrifting for valentine items.


Wooden heart sign for $0.75 and a fabric heart ornament for $0.25


4 napkin rings for $2.50


wooden heart hook $1.50


papier mache heart shape box for trinkets


Wooden heart shape for $1.25

Can't wait to incorporate these items into my February Valentine decor.


Thank you for stopping by, so until the next time, take care and may God Bless you - Vicki

Sunday, January 19, 2020

Two diy Pine Cone Projects for the Winter Decor


********
1st diy

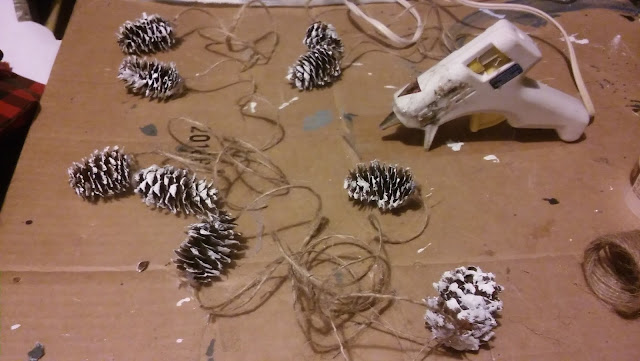
Using fir tree cones that I had collected, I decided to add a little Waverly white chalk paint to the cones and hot glue a jute string for hanging.


Here I gathered a bundle of painted fir cones and hung them from a shelve.


***************
2nd DIY
Here I used some fir cones as a vase filler


A Bonus diy
These two glass vase I use alot on my mantel, I added some burlap ribbon to the top of the vase and glued three of the  fir cones on a string to the front


I think it adds a little woodsy feel to the mantel.


Thank you for stopping by, so until next project.  

Take care,
Vicki 

DIY Pine Cone Garland for the Winter Mantel


I had been thinking about making this DIY pine cone garland project for some time.  I had been collecting pine cones for a while and had a good stash of pine cones for this project.

  Using jute string from Dollar Tree, I measured the length of the mantel, spaced out the pine cones to about 4-5" apart and hot glue the pine cones to the jute string.


I thought the cones didn't make a statement I was looking, they were to small


So I used a larger pine cone, hot glued the pine cone to another piece of jute string after measuring the length of the mantel.


I believe by adding the larger pine cone garland, has improved the over all look of the mantel.

Thank you for checking back for another DIY project.  Let me know, Do you use pine cones in your winter decor or use them all year round?


So until the next project, 
take care, 
Vicki


Winter Rustic/Farmhouse Mantel Display

Winter 

This has taken me a while to get all of my DIY project done that I wanted to try this year, so as you can see I have add a few new DIY's to my winter farmhouse mantel decor.  

One of the DIY's is the giant snow flake made from craft sticks, this was a every easy project.  

The pine cone wreath that was made from items I already had on hand.
Two clear vases I gave a face lift by adding burlap, and filler of little painted fir cones that I collected last summer, the two pine cone garlands and Yarn pom-pom snow balls.

I did bring back the frosted pine cone and the fore-birch back candles. I made for my farmhouse decor last winter
  I really like how the mantel came out this season. 

Thank you for checking in to see this working in progress of my winter mantel.

Until the next project............

 take care, Vicki 

Paper Snowflake and large craft sicks from Dollar Tree Project

I found another way to use the snowflake cut outs I made from book pages.


Using the larger craft sticks from Dollar Tree, I built a plaque to glue the left over snowflake on.


Once I had the little plaque glued together this what they looked like
I added a light coat of Waverly White Chalk paint.


Using watered down black and brown acrylic paint to added some distress aging.


I brushed some watered down brown paint to the paper snowflake to age them and glue the snowflake to the plaque.


I really wasn't in love with this project so I decided to cut the rounded end off and added two small jenga block so these plaque would stand.

Thank you for stopping be to see another one of my projects.

Let me know which one of the snowflake projects you have tried.

Until the next project take care of yourself,
Vicki

Saturday, January 18, 2020

Diy Snowflakes Projects For My Winter Decor


Last year I cut out a few different patterns from paper snowflake patterns card-stock and attached the paper snow flakes to the small willow wreath forms I use around the house.

 This year, I'm still using snowflake in my winter decor, but I'm branching out and using some different mediums like stencils, box signs from Dollar Tree, and old book pages. 

*********

For both of the diy, I painted 6 x 6 little box sign from Dollar Tree
with Waverly white chalk paint.


For the first project


With a mix of blue and acrylic paint, I came up with a gray color 


placing a snowflake from Wal-Mart on top of the box sign  then using paint brush I brushed the gray color over the snowflake ornament while holding down the snowflake and let dry.  Turned out like this, not to bad this project was a bit harder than I thought.


So, the second box sign I painted the top  with the gray color, let dry and mod-podge a paper snowflake on it, quiet a bit easier.


******************

Using two more of the painted 6 x 6 little box sign from Dollar Tree that I painted with Waverly white chalk paint.


 I measured out lines to make the appearance of a wood strips.


Then I went back over the lines I drew and using my box cutter and a ruler made grooves on the lines to emphasize the board lines.


 I went back and added brown and black paint over the grooved lines to add distress marks.


With the  snow flake pattern  I found on Pinterest, I used old paper back I had and made the snowflake from the book pages.


I used tacky glue to attach the paper snowflake to the box sign.  I really like how these turned out.


*********************

Thank you for stopping by, I hope I gave you some simple ideas to add to your winter decor.


Until the next project, Vicki